Moose Farts are chewy, coconut-packed no-bake balls coated in graham cracker crumbs and studded with chocolate chips—a quirky Canadian Christmas classic that's been showing up on holiday dessert trays for decades. I first tried them at a neighborhood cookie swap years ago, and the name alone made everyone laugh before they even took a bite.

They're ridiculously simple to make, need just a handful of pantry ingredients, and come together in about 15 minutes of hands-on time. If you love easy no-bake sweets, you'll want to try these Air Fryer Churro Bites or these Caramel Apple Cheesecake Bars Recipe next—they have that same grab-and-go holiday magic.
Why You'll Love This Moose Farts Recipe
This Moose Farts recipe is perfect if you're looking for a no-fuss holiday treat that doesn't require an oven. The dough comes together in one bowl, chills in about an hour, and tastes like a cross between a coconut macaroon and a chewy no-bake cookie. The graham cracker coating adds a light crunch, and the chocolate chips give each bite a little sweetness without making them overly rich. They're great for cookie exchanges, gift tins, or just keeping in the fridge when you need something sweet. Plus, the name guarantees a laugh every single time.
Jump to:
Ingredients For Moose Farts Recipe
Here's everything you need to make these classic Canadian coconut balls.
½ cup unsalted butter, softened: Adds richness and helps bind the mixture together. Make sure it's soft enough to stir easily.
14 ounces sweetened condensed milk (1 can): Provides sweetness and moisture, acting as the glue that holds everything together.
1 teaspoon vanilla extract: Enhances the overall flavor and balances the sweetness.
3 cups sweetened shredded coconut: The star ingredient. It gives the balls their chewy texture and tropical flavor.
1 cup graham cracker crumbs (plus extra for rolling): Adds structure and a subtle honey-like flavor. The extra crumbs create a lightly crunchy coating.
¼ teaspoon salt: Balances the sweetness and brings out the other flavors.
½ cup chocolate chips: Adds little pockets of chocolate throughout. You can use mini chips for more even distribution.
See recipe card for quantities.
Instructions For Moose Farts Recipe
Follow these simple steps to make your no-bake Moose Farts from start to finish.
Mix the wet ingredients: In a large bowl, stir together the softened butter, sweetened condensed milk, and vanilla extract until the mixture is completely smooth and creamy.
Add the dry ingredients: Stir in the shredded coconut, graham cracker crumbs, salt, and chocolate chips. Mix until everything is fully combined and the texture is thick and sticky.
Chill the dough: Cover the bowl and refrigerate the mixture for 30 minutes to 1 hour, until it's firm enough to roll without sticking to your hands.
Shape the balls: Use a cookie scoop or your hands to form the mixture into 1-inch balls. They don't need to be perfect—slightly uneven shapes are totally fine.
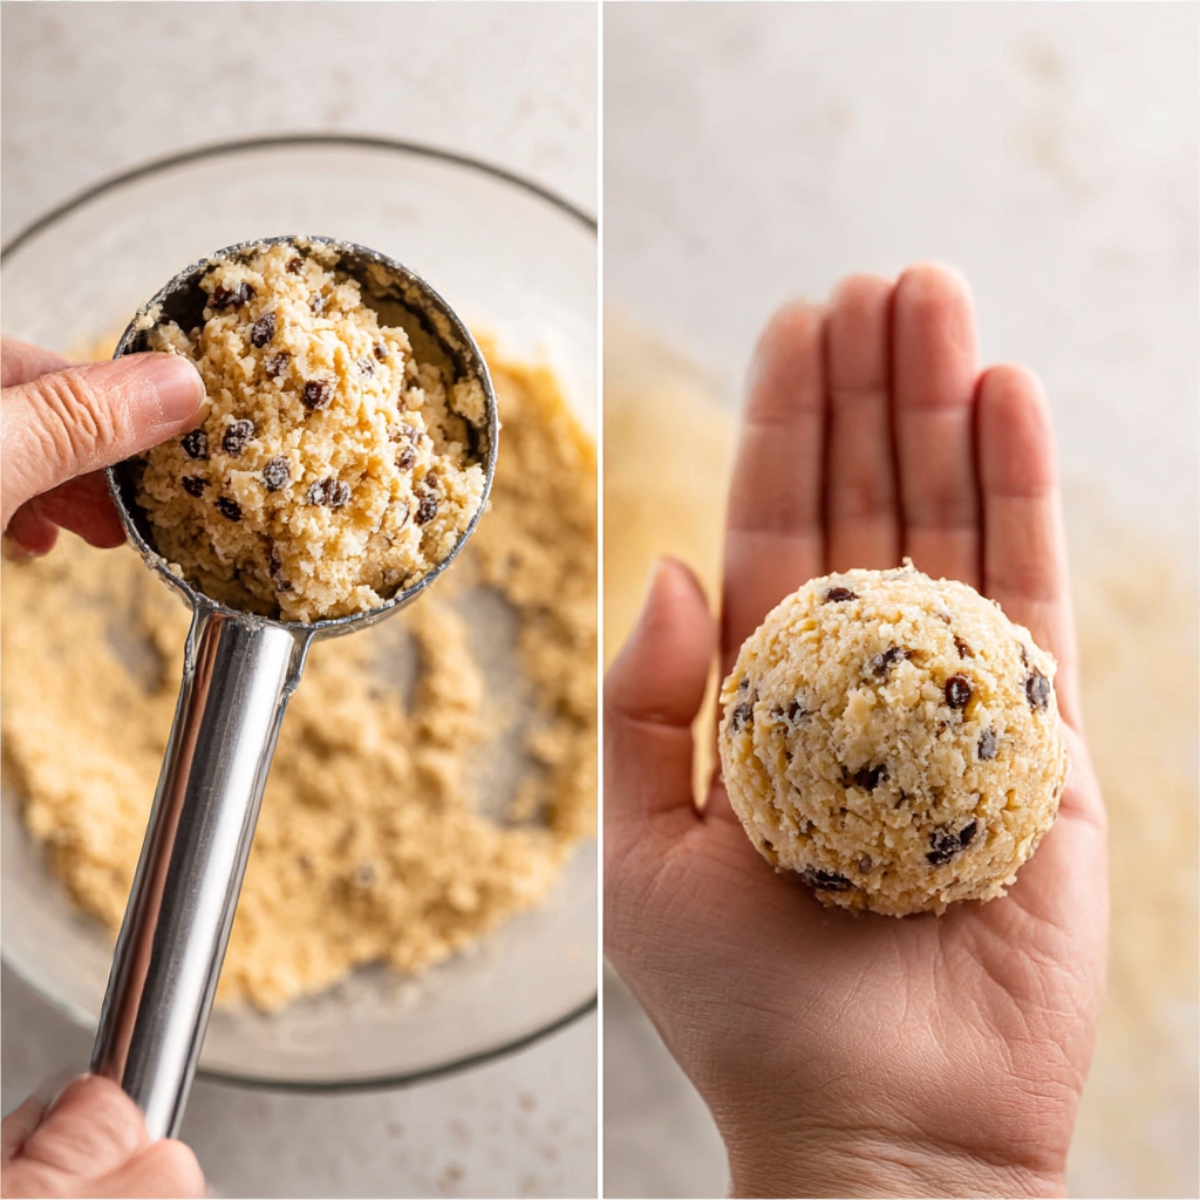
Coat with crumbs: Roll each ball in additional graham cracker crumbs until fully coated. Press gently so the crumbs stick.
Set in the fridge: Place the coated balls on a baking sheet or in an airtight container and refrigerate for another 30 minutes to let them firm up before serving.
Substitutions and Variations
You can easily customize this moose farts recipe no-bake to suit your preferences or what you have on hand.
Butter: Swap in coconut oil for a dairy-free version. It will give the balls a slight coconut flavor boost.
Sweetened condensed milk: Use a plant-based condensed milk alternative if you're avoiding dairy.
Coconut: If you're not a fan of coconut, try finely chopped almonds or crushed vanilla wafers instead. The texture will be different, but still delicious.
Graham cracker crumbs: Crushed digestive biscuits, vanilla wafer crumbs, or even crushed pretzels work well as a substitute.
Chocolate chips: Try mini chocolate chips, white chocolate chips, or even chopped dried cranberries for a festive twist.
Add-ins: Stir in a tablespoon of cocoa powder for a chocolate version, or add a pinch of cinnamon for warmth.
Equipment For Moose Farts Recipe
This recipe comes together with just a few basic kitchen tools.
Large mixing bowl: For combining all the ingredients.
KitchenAid hand mixer (or mixing spoon): A spoon works fine, but a hand mixer makes blending the butter and condensed milk easier.
Cookie scoop (optional): Helps you portion the balls evenly, though your hands work just as well.
Baking sheet or airtight container: For chilling and storing the finished balls.
Refrigerator: Essential for firming up the dough and setting the final texture.
Storage Tips
These Canadian no-bake dessert balls store beautifully and actually taste better after a day or two in the fridge.
Refrigerator: Store in an airtight container for up to 2 weeks. The flavors meld together nicely over time.
Freezer: Freeze the balls in a single layer on a baking sheet, then transfer to a freezer-safe bag or container for up to 3 months. Thaw in the fridge before serving.
Room temperature: These can sit out for a few hours at a party, but they're best kept cold to maintain their shape.
Expert Tips for Perfect Moose Farts
A few small tricks will help you get the best texture and flavor every time.
Chill the dough properly: Don't skip the first chill. If the mixture is too soft, the balls will fall apart or be difficult to roll.
Use room-temperature butter: Softened butter blends more easily and creates a smoother base.
Press the crumbs gently: When rolling the balls in graham cracker crumbs, press lightly so the coating sticks without flattening the shape.
Make them uniform: Use a cookie scoop to keep the balls roughly the same size. This helps with even chilling and makes them look more polished on a dessert tray.
Let them set: The second chill is just as important. It firms up the coating and makes the balls easier to handle.
Customize the sweetness: If you prefer less sweetness, use unsweetened coconut and reduce the chocolate chips slightly.
FAQ
Where did moose farts originate?
Moose Farts are believed to have originated in Western Canada, particularly in Alberta and Saskatchewan, where they became a popular Christmas treat. The exact origin isn't documented, but they've been a staple at holiday gatherings for decades. The playful name likely came from someone with a great sense of humor, and it stuck because it's so memorable—especially with kids.
What is moose fart?
A moose fart is a no-bake dessert ball made with sweetened shredded coconut, graham cracker crumbs, sweetened condensed milk, butter, and chocolate chips. The mixture is rolled into bite-sized balls, coated in extra crumbs, and chilled until firm. They're chewy, lightly sweet, and have a texture similar to coconut macaroons. Despite the funny name, they're a beloved Canadian holiday tradition.
How long do moose farts last in the fridge?
Moose Farts will last up to 2 weeks in the fridge when stored in an airtight container. The texture actually improves after a day or two as the flavors meld together. If you want to make them even further ahead, freeze them for up to 3 months and thaw in the fridge before serving. My mom always made a double batch and kept half in the freezer so we'd have them ready for unexpected guests.
Related
Looking for other recipes like this? Try these:


Pairing
These are my favorite dishes to serve with [this recipe]:


Canadian Moose Fart Bites
Ingredients
Equipment
Method
- Combine the softened butter, sweetened condensed milk, and vanilla in a large bowl and stir until the mixture looks thick, glossy, and completely uniform.
- Add the shredded coconut, graham cracker crumbs, salt, and chocolate chips, stirring until everything is evenly distributed and the mixture becomes dense.
- Place the bowl in the refrigerator and chill for 30 minutes to allow the mixture to firm up for easier handling.
- Portion the chilled mixture and roll it between your palms to form balls about one inch in size.
- Roll each formed ball in the extra graham cracker crumbs until fully coated on all sides.
- Transfer the coated bites to a tray or container and refrigerate for another 30 minutes so they fully set.

Leave a Reply